Mapbox Vector Tiles (MVT) format is a compact and efficient way to represent vector data for geographic maps. Developed by Mapbox, it is widely used in various geographic information systems and applications.

Here’s how it works. MVT (Mapbox Vector Tiles) format is a set of tiles, where each tile includes vector geometrical data and attributes for a specific rectangular region of the map. Each tile contains all the necessary data for displaying a particular zoom level.
MVT supports a variety of vector data, including points, lines, and polygons. Data is organized into layers, which can contain different types of geometry and attributes.
To reduce file size and improve performance, the data is compressed using various encodings such as delta and varint encoding. Additionally, MVT can simplify geometries for further optimization.
MVT is supported by multiple libraries (Mapbox GL, OpenLayers, Leaflet) as well as tools for reading, writing, and displaying tiles (such as Tippecanoe and Mapbox Studio).
With MVT you can store and transmit large volumes of geographical data in a compact format. This makes MVT especially useful for web maps and mobile applications, where it is crucial to use network resources efficiently and provide quick access to the data.
NextGIS Web serves as a repository for vector geographical data.
For every vector layer created in NextGIS Web a link to vector tiles is generated automatically:
https://demo.nextgis.com/api/component/feature_layer/mvt?resource=7111&z={z}&x={x}&y={y}You can use it in third-party web applications and map builders. The highlighted parts are the Web GIS URL and the resource ID of the vector layer. This link is used to transmit the information about the layer. The layer’s style is configured on the client side.
To connect a vector layer as MVT to your application all you need is the URL of your Web GIS and the resource ID. Our team has developed JavaScript libraries for this purpose.
All libraries are available for free download on NextGIS Frontend.
The service also provides examples of their use. Let’s take one of these examples to display a vector layer.
Add the link to the Web GIS to the “baseURL” line (32) and the resource ID to the “resource” line (38).
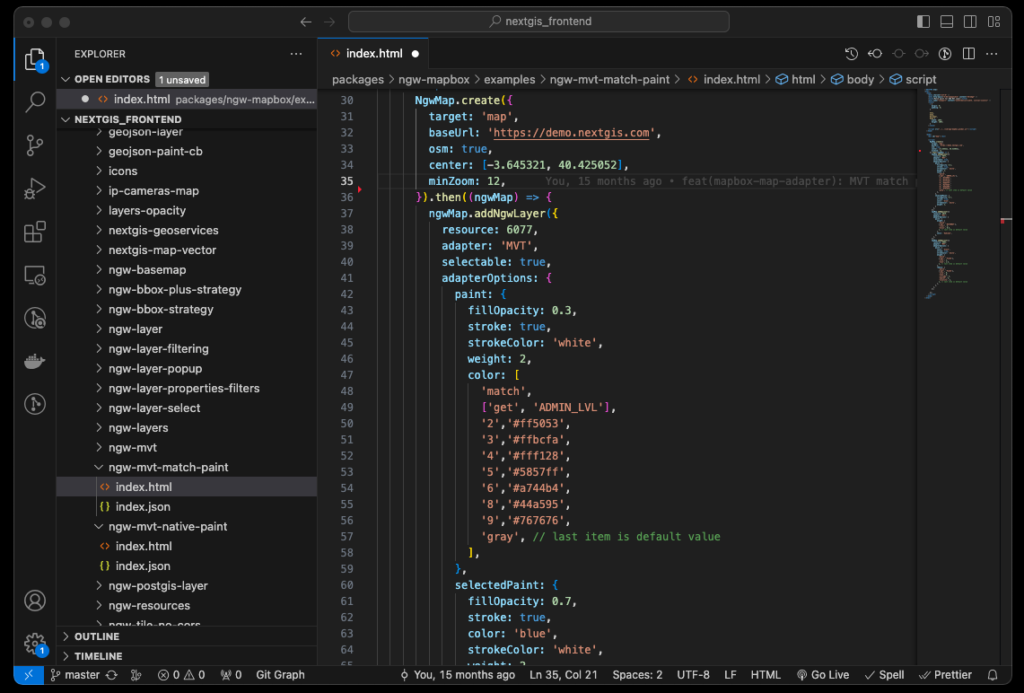
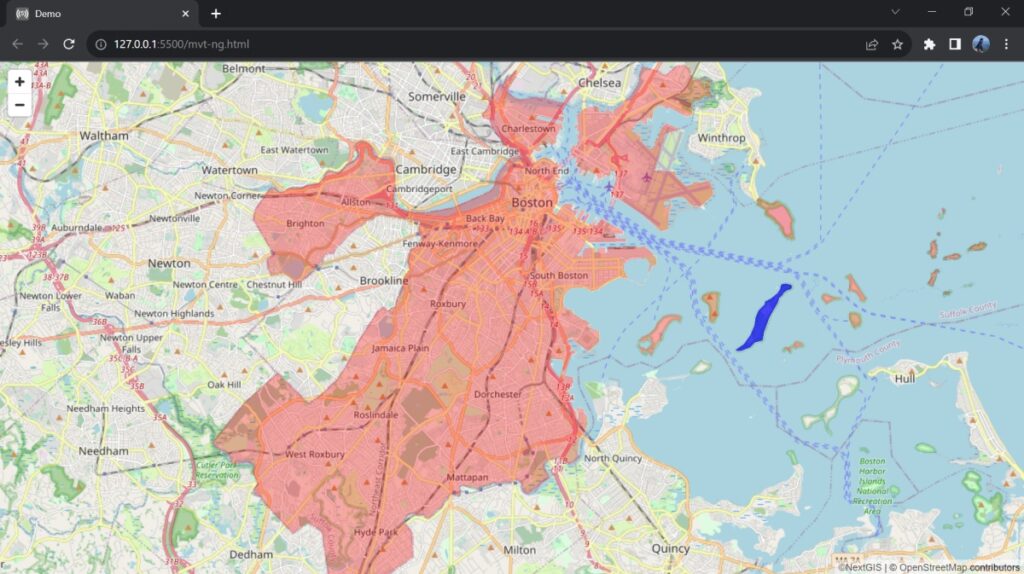
Open the HTML page in a web browser to see the map.
You can configure additional map elements using NextGIS Frontend.
To display data from your Web GIS in external applications, you need to open read access to the layer in the Web GIS settings. Alternatively, you can specify Web GIS login credentials in the web application itself.
In the Web GIS settings, you need to configure your CORS (Cross-Origin Resource Sharing) settings.
Take a look at the projects of our clients who use vector tiles in their web applications.
You can use the link to vector tiles generated by NextGIS Web in QGIS to set up representation of a vector layer from your Web GIS in the desktop application.
To connect the tiles, select Layer -> Add layer -> Add Vector Tile Layer in QGIS.
You can use the layer as a basemap, customize its style, identify objects and view attribute descriptions.